

Mocking is an essential part of unit testing, and the Mockito library makes it easy to write clean and intuitive unit tests for your Java code.
Get started with mocking and improve your application tests using our Mockito guide:
Handling concurrency in an application can be a tricky process with many potential pitfalls. A solid grasp of the fundamentals will go a long way to help minimize these issues.
Get started with understanding multi-threaded applications with our Java Concurrency guide:
Spring 5 added support for reactive programming with the Spring WebFlux module, which has been improved upon ever since. Get started with the Reactor project basics and reactive programming in Spring Boot:
Since its introduction in Java 8, the Stream API has become a staple of Java development. The basic operations like iterating, filtering, mapping sequences of elements are deceptively simple to use.
But these can also be overused and fall into some common pitfalls.
To get a better understanding on how Streams work and how to combine them with other language features, check out our guide to Java Streams:
Explore Spring Boot 3 and Spring 6 in-depth through building a full REST API with the framework:
Yes, Spring Security can be complex, from the more advanced functionality within the Core to the deep OAuth support in the framework.
I built the security material as two full courses - Core and OAuth, to get practical with these more complex scenarios. We explore when and how to use each feature and code through it on the backing project.
You can explore the course here:
Spring Data JPA is a great way to handle the complexity of JPA with the powerful simplicity of Spring Boot.
Get started with Spring Data JPA through the guided reference course:
Refactor Java code safely — and automatically — with OpenRewrite.
Refactoring big codebases by hand is slow, risky, and easy to put off. That’s where OpenRewrite comes in. The open-source framework for large-scale, automated code transformations helps teams modernize safely and consistently.
Each month, the creators and maintainers of OpenRewrite at Moderne run live, hands-on training sessions — one for newcomers and one for experienced users. You’ll see how recipes work, how to apply them across projects, and how to modernize code with confidence.
Join the next session, bring your questions, and learn how to automate the kind of work that usually eats your sprint time.
Distributed systems often come with complex challenges such as service-to-service communication, state management, asynchronous messaging, security, and more.
Dapr (Distributed Application Runtime) provides a set of APIs and building blocks to address these challenges, abstracting away infrastructure so we can focus on business logic.
In this tutorial, we'll focus on Dapr's pub/sub API for message brokering. Using its Spring Boot integration, we'll simplify the creation of a loosely coupled, portable, and easily testable pub/sub messaging system:
1. Introduction
JavaFX is a library for building rich client applications with Java. It provides an API for designing GUI applications that run on almost every device with Java support.
In this tutorial, we’re going to focus on and cover some its key capabilities and functionality.
2. JavaFX API
In Java 8, 9, and 10 no additional setup is necessary to start working with the JavaFX library. The project will be removed from the JDK starting with JDK 11 and the following dependencies and plugin should be added to pom.xml:
<dependencies>
    <dependency>
        <groupId>org.openjfx</groupId>
        <artifactId>javafx-controls</artifactId>
        <version>19</version>
    </dependency>
    <dependency>
        <groupId>org.openjfx</groupId>
        <artifactId>javafx-fxml</artifactId>
        <version>19</version>
    </dependency>
</dependencies>

<build>
    <plugins>
        <plugin>
            <groupId>org.openjfx</groupId>
            <artifactId>javafx-maven-plugin</artifactId>
            <version>0.0.8</version>
            <configuration>
                <mainClass>Main</mainClass>
            </configuration>
        </plugin>
    </plugins>
</build>
2.1. Architecture
JavaFX uses hardware accelerated graphics pipeline for the rendering, known as Prism. What’s more, to fully accelerate the graphics usage, it leverages either software or hardware rendering mechanism, by internally using DirectX and OpenGL.
JavaFX has a platform dependent Glass windowing toolkit layer to connect to the native operating system. It uses the operating system’s event queue to schedule thread usage. Also, it asynchronously handles windows, events, timers.
The Media and Web engines enable media playback and HTML/CSS support.
Let’s see what the main structure of a JavaFX application looks like:
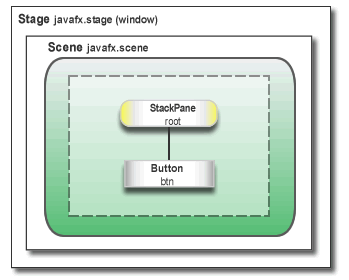
Here, we notice two main containers:
- Stage is the main container and the entry point of the application. It represents the main window and passed as an argument of the start() method.
- Scene is a container for holding the UI elements, such as Image Views, Buttons, Grids, TextBoxes.
The Scene can be replaced or switched to another Scene. This represents a graph of hierarchical objects, which is known as a Scene Graph. Each element in that hierarchy is called a node. A single node has its ID, style, effects, event handlers, state.
Additionally, the Scene also contains the layout containers, images, media.
2.2. Threads
At the system level, the JVM creates separate threads for running and rendering the application:
- Prism rendering thread – responsible for rendering the Scene Graph separately.
- Application thread – is the main thread of any JavaFX application. All the live nodes and components are attached to this thread.
2.3. Lifecycle
The javafx.application.Application class has the following lifecycle methods:
- init() – is called after the application instance is created. At this point, the JavaFX API isn’t ready yet, so we can’t create graphical components here.
- start(Stage stage) – all the graphical components are created here. Also, the main thread for the graphical activities starts here.
- stop() – is called before the application shutdown; for example, when a user closes the main window. It’s useful to override this method for some cleanup before the application termination.
The static launch() method starts the JavaFX application.
2.4. FXML
JavaFX uses a special FXML markup language to create the view interfaces.
This provides an XML based structure for separating the view from the business logic. XML is more suitable here, as it’s able to quite naturally represent a Scene Graph hierarchy.
Finally, to load up the .fxml file, we use the FXMLLoader class, which results in the object graph of the scene hierarchy.
3. Getting Started
To get practical, and let’s build a small application that allows searching through a list of people.
First, let’s add a Person model class – to represent our domain:
public class Person {
    private SimpleIntegerProperty id;
    private SimpleStringProperty name;
    private SimpleBooleanProperty isEmployed;

    // getters, setters
}
Notice how, to wrap up the int, String and boolean values, we’re using the SimpleIntegerProperty, SimpleStringProperty, SimpleBooleanProperty classes in the javafx.beans.property package.
Next, let’s create the Main class that extends the Application abstract class:
public class Main extends Application {

    @Override
    public void start(Stage primaryStage) throws Exception {
        FXMLLoader loader = new FXMLLoader(
          Main.class.getResource("/SearchController.fxml"));
        AnchorPane page = (AnchorPane) loader.load();
        Scene scene = new Scene(page);

        primaryStage.setTitle("Title goes here");
        primaryStage.setScene(scene);
        primaryStage.show();
    }

    public static void main(String[] args) {
        launch(args);
    }
}
Our main class overrides the start() method, which is the entry point for the program.
Then, the FXMLLoader loads up the object graph hierarchy from SearchController.fxml into the AnchorPane.
After starting a new Scene, we set it to the primary Stage. We also set the title for our window and show() it.
Note that it’s useful to include the main() method to be able to run the JAR file without the JavaFX Launcher.
3.1. FXML View
Let’s now dive deeper into the SearchController XML file.
For our searching application, we’ll add a text field to enter the keyword and the search button:
<AnchorPane
  xmlns:fx="http://javafx.com/fxml"
  xmlns="http://javafx.com/javafx"
  fx:controller="com.baeldung.view.SearchController">
    <children>

        <HBox id="HBox" alignment="CENTER" spacing="5.0">
            <children>
                <Label text="Search Text:"/>
                <TextField fx:id="searchField"/>
                <Button fx:id="searchButton"/>
            </children>
        </HBox>

        <VBox fx:id="dataContainer"
              AnchorPane.leftAnchor="10.0"
              AnchorPane.rightAnchor="10.0"
              AnchorPane.topAnchor="50.0">
        </VBox>

    </children>
</AnchorPane>
AnchorPane is the root container here, and the first node of the graph hierarchy. While resizing the window, it will reposition the child to its anchor point. The fx: controller attribute wires the Java class with the markup.
There are some other built-in layouts available:
- BorderPane – divides the layout into five sections: top, right, bottom, left, center
- HBox – arrange the child components in a horizontal panel
- VBox – the child nodes are arranged in a vertical column
- GridPane – useful for creating a grid with rows and columns
In our example, inside of the horizontal HBox panel, we used a Label to place text, TextField for the input, and a Button. With fx: id we mark the elements so that we can use them later in the Java code.
The VBox panel is where we’ll display the search results.
Then, to map them to the Java fields – we use the @FXML annotation:
public class SearchController {

    @FXML
    private TextField searchField;
    @FXML
    private Button searchButton;
    @FXML
    private VBox dataContainer;
    @FXML
    private TableView tableView;

    @FXML
    private void initialize() {
        // search panel
        searchButton.setText("Search");
        searchButton.setOnAction(event -> loadData());
        searchButton.setStyle("-fx-background-color: #457ecd; -fx-text-fill: #ffffff;");

        initTable();
    }
}
After populating the @FXML annotated fields, initialize() will be called automatically. Here, we’re able to perform further actions over the UI components – like registering event listeners, adding style or changing the text property.
In the initTable() method we’ll create the table that will contain the results, with 3 columns, and add it to the dataContainer VBox:
private void initTable() {
    tableView = new TableView<>();
    TableColumn id = new TableColumn("ID");
    TableColumn name = new TableColumn("NAME");
    TableColumn employed = new TableColumn("EMPLOYED");
    tableView.getColumns().addAll(id, name, employed);
    dataContainer.getChildren().add(tableView);
}
Finally, all of this logic described here will produce the following window:

4. Binding API
Now that the visual aspects are handled, let’s start looking at binding data.
The binding API provides some interfaces that notify objects when a value change of another object occurs.
We can bind a value using the bind() method or by adding listeners.
Unidirectional binding provides a binding for one direction only:
searchLabel.textProperty().bind(searchField.textProperty());Here, any change in the search field will update the text value of the label.
By comparison, bidirectional binding synchronizes the values of two properties in both directions.
The alternative way of binding the fields are ChangeListeners:
searchField.textProperty().addListener((observable, oldValue, newValue) -> {
    searchLabel.setText(newValue);
});
The Observable interface allows observing the value of the object for changes.
To exemplify this, the most commonly used implementation is the javafx.collections.ObservableList<T> interface:
ObservableList<Person> masterData = FXCollections.observableArrayList();
ObservableList<Person> results = FXCollections.observableList(masterData);
Here, any model change like insertion, update or removal of the elements, will notify the UI controls immediately.
The masterData list will contain the initial list of Person objects, and the results list will be the list we display upon searching.
We also have to update the initTable() method to bind the data in the table to the initial list, and to connect each column to the Person class fields:
private void initTable() {
    tableView = new TableView<>(FXCollections.observableList(masterData));
    TableColumn id = new TableColumn("ID");
    id.setCellValueFactory(new PropertyValueFactory("id"));
    TableColumn name = new TableColumn("NAME");
    name.setCellValueFactory(new PropertyValueFactory("name"));
    TableColumn employed = new TableColumn("EMPLOYED");
    employed.setCellValueFactory(new PropertyValueFactory("isEmployed"));

    tableView.getColumns().addAll(id, name, employed);
    dataContainer.getChildren().add(tableView);
}
5. Concurrency
Working with the UI components in a scene graph isn’t thread-safe, as it’s accessed only from the Application thread. The javafx.concurrent package is here to help with multithreading.
Let’s see how we can perform the data search in the background thread:
private void loadData() {
    String searchText = searchField.getText();
    Task<ObservableList<Person>> task = new Task<ObservableList<Person>>() {
        @Override
        protected ObservableList<Person> call() throws Exception {
            updateMessage("Loading data");
            return FXCollections.observableArrayList(masterData
                    .stream()
                    .filter(value -> value.getName().toLowerCase().contains(searchText))
                    .collect(Collectors.toList()));
        }
    };
}
Here, we create a one-time task javafx.concurrent.Task object and override the call() method.
The call() method runs entirely on the background thread and returns the result to the Application thread. This means any manipulation of the UI components within this method, will throw a runtime exception.
However, updateProgress(), updateMessage() can be called to update Application thread items. When the task state transitions to SUCCEEDED state, the onSucceeded() event handler is called from the Application thread:
task.setOnSucceeded(event -> {
    results = task.getValue();
    tableView.setItems(FXCollections.observableList(results));
});
In the same callback, we’ve updated the tableView data to the new list of results.
The Task is Runnable, so to start it we need just to start a new Thread with the task parameter:
Thread th = new Thread(task);
th.setDaemon(true);
th.start();
The setDaemon(true) flag indicates that the thread will terminate after finishing the work.
6. Event Handling
We can describe an event as an action that might be interesting to the application.
For example, user actions like mouse clicks, key presses, window resize are handled or notified by javafx.event.Event class or any of its subclasses.
Also, we distinguish three types of events:
- InputEvent – all the types of key and mouse actions like KEY_PRESSED, KEY_TYPED, KEY_RELEASED or MOUSE_PRESSES, MOUSE_RELEASED
- ActionEvent – represents a variety of actions like firing a Button or finishing a KeyFrame
- WindowEvent – WINDOW_SHOWING, WINDOW_SHOWN
To demonstrate, the code fragment below catches the event of pressing the Enter key over the searchField:
searchField.setOnKeyPressed(event -> {
    if (event.getCode().equals(KeyCode.ENTER)) {
        loadData();
    }
});
7. Style
We can change the UI of the JavaFX application by applying a custom design to it.
By default, JavaFX uses modena.css as a CSS resource for the whole application. This is a part of the jfxrt.jar.
To override the default style, we can add a stylesheet to the scene:
scene.getStylesheets().add("/search.css");We can also use inline style; for example, to set a style property for a specific node:
searchButton.setStyle("-fx-background-color: slateblue; -fx-text-fill: white;");8. Conclusion
This brief write-up covers the basics of JavaFX API. We went through the internal structure and introduced key capabilities of its architecture, lifecycle, and components.
As a result, we learned and are now able to create a simple GUI application.


